

BRIC Guidelines for Summer Pre-Recorded Content
Please review the following as a guideline to structure your yoga and mindfulness practice. Our goal is to provide five practices per week on One Brooklyn TV in collaboration with BRIC. You will have two options to present
Present an entire 20-30-minute practice
Present a 20-30 min practice in collaboration with a partner
Each teacher presents a piece of the practice (ie: breathing practice, mindfulness piece, or yoga piece).
When submitting your videos please let us know your partner so that the videos can be edited together
Planning for Recording
Content
Ensure a comprehensive flow to your practice
Draw material from the various texts from the YMTPP course (handbook, Children’s Guide, Teacher Guide, etc.)
Introduce yourself (name and title), include that you are a graduate of the Yoga and Mindfulness Teacher Preparation Program
Remote Media Production Tips
Placement (this is for an interview but helpful)
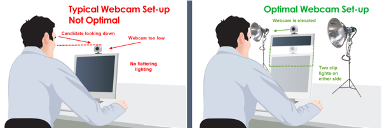
You should have your camera, whether built into your laptop or phone or external, elevated to be just above your eyeline. If you have a laptop, keeping it open 90O will give you a great “straight on” shot.
Having your camera aimed at your forehead will also help with posture and creating a uniform look across all participants.
The lights to the sides give an even spread of light to wash away any shadows and are far back enough to not wash out the guests face
Framing the shot
Generally the subject should place themselves according to the Rule of thirds. Imagine 4 lines across your screen as shown below

Imagine your eyes bisecting the upper middle line allowing for only a few inches above your head.


This image from Epiphan Video shows what it looks like having the camera at a level lower than your eye-line. Also having a bright window behind and overhead light cause shadows on the face
Light
Lighting yourself and your surroundings is a simple but important part of creating a high quality looking digital event. The three parts you should remember are Color, Intensity, and Angle.
Color
The lightbulbs you have around your house work great to light you. The cooler the color temperature, the better. LED light bulbs generally have a colder, bluer tone that registers better on camera. Avoid using the “Vintage” light bulbs or any type of party colored bulbs as they are not as flattering. Aiming some light at your background can avoid the “Void” effect where your viewers have a hard time determining where you are in space.
Intensity
The Intensity of a light is just how bright it is. Having lights that are too bright will wash out your face and make it impossible to see any definition. Alternatively, having it too dark will leave the viewer wondering who it is that they are watching! If you have a window behind you, cover it or try to find a different space or angle to stream from. Windows can create what is called “blowout” which occurs when the intensity of the light behind is too high.


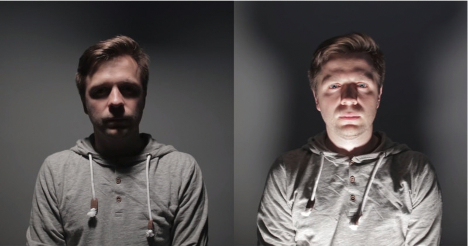
Angle
The lights should be placed behind your screen to the left and right. The best height for the light source is about one hand’s length (wrist to fingertips) above your screen or camera. Having the lights in this position will create an even wash across the face. If your lights are too low or too or too high they will create long shadows across your face as seen below.
Credit: Koldunov Brothers
Best Practices
Find a spot where it’s quiet, with no loud noises, traffic, etc. in the background; mute other sounds (other phones in home, television, etc.)
Make sure the space is clean and uncluttered with a background that is clear and not busy
Make sure there is no product placements: Remove any visible logos and double-check to be sure.
No logo on your clothing, no Nike swoosh
No logo on your yoga mat
No Poland Spring water bottle next to you
If recording on a phone record horizontally so you can capture the whole background while you are moving
Having white/colder tone light bulbs, LED Bulbs or bulbs that create a light blue color.
Having the wall behind you lit in someway to provide depth and even front light
Having 2 lights behind your phone/recording device to the left and right and one hand length above the screen
Rehearse and time your presentation to ensure time requirements are met; you are strongly encouraged to rehearse your practice by presenting your phone or other recording device OR rehearsing into a mirror; this will enable you to become more familiar and comfortable with the idea of speaking into and presenting to a screen
Ensure the proximity of your phone/recording device to your mat or chair will capture the entirety of your practice and body throughout the presentation
Have cue cards/written notes by your computer/laptop or the wall behind your computer; however, please make every effort to not “read” your notes during presentation; use your notes solely as a reference to guide your flow and practice
Make eye contact with the camera the entire time. Pretend the camera is someone you’re talking to one-on-one. The more engaged you are, the more engaged your viewers will be.
Things to Avoid
Party colored lights will not register well on camera and can be unflattering.
Harsh Backlight: Sitting in front of windows or having lights behind you aimed directly at camera
Having lights at extreme angles creates large shadows on your face